I’m clearing some things out to make room for new items. Everything is 15% off through January 11th.
Stop by and take a look. QuiltingByJudiB

I’m clearing some things out to make room for new items. Everything is 15% off through January 11th.
Stop by and take a look. QuiltingByJudiB
I don’t know about you but I am ready for Christmas this year!
I’ve been working hard on some mew items to post in my Etsy shop. Here are a few.
Beautiful quilted Christmas stockings. Fully lined and ready to be personalized. I can also do custom stockings if you would like to update your decor this year or gift a set to someone special.

This pillow cover was inspired by a visit I had from someone special earlier this year. Don’t you just love goats in PJ’s? I used a patterned called Kidding Around by Art East Quilting Company. This little guy is all decked out in his Christmas pajamas.


And lastly (for now) I pulled out my crochet hook and made these beautiful Christmas Doilies. How beautiful would these look as a centerpiece or on display on the sideboard?

Don’t forget to check out the other items in my shop. Im always adding something new. Most of my orders are custom made items. Please reach out to me if you want me to make you something wonderful!


I simply love this new, modern technique for making Cathedral Window squares. It is very time consuming but the outcome is well worth it. Precision is the key! Think of this as fabric Origami. Precise folding, pressing and stitching are needed to achieve nice looking “windows”. There is no batting or “quilt sandwich” when using this process. The weight comes from the cotton folded in layers A nice option for a summer quilt.
For this project I am using Kona Cotton for the background and back of the pillow cover. For the little “windows” I have cut some 2 1/2″ squares from jellyroll strips of Moda Sumer Breeze III.
Prepare your fabric
Cut 9, 10″ squares of your background fabric. For my project I used Kona Cotton in white. It is important that you starch and press your fabric to insure you have perfect squares (or as close to perfect as possible:). For the windows you will need 18, 2 1/2′ squares of colorful fabric. Here I used 2 1/2″ squares cut from jellyroll strips.

PREPARE YOUR BACKGROUND FABRIC
Use very accurate 1/4′ seams.
Always secure your stitching at the beginning and end.
When pressing use steam and sizing/starch.
Here is where origami comes in. The 10″ inch squares of background fabric will be folded and stitched into a much smaller square. First fold each square in half. Stitch up the two short sides with a 1/4″ seam. Be sure to secure your stitches at the beginning and end of the seam, clip each of the folded corners. I did this will all 9 of my squares before proceeding. Take each folded rectangle and open it up, folding again so that the two side seams meet. Nest the seams so that one goes left and one goes right. At first I used a pins to hold the seams together but found it was easier to just pinch my seams together with my fingers. Stitch a 1/4″ seam from one corner, over the nested seams, and about an inch beyond the netted seams, lock the stitching. Leave an opening of about 2 inches and begin stitching again to the corner, again secure your stitches (This will allow you to turn the fabric inside out.) Carefully turn each piece inside out. I used That Purple Thang (TPT) to make my corners nice and sharp and to move the seams so that they will all lie flat and neat. Press each square with steam if you have it. You do not need to sew the opening closed, it should naturally close when you press the seams down.


After all of your blocks are pressed you will do some folding and pressing. I have found that steam at this stage really helps keep things in place. Fold all four corners of the pressed square into the center and press. The sides of the squares need to have nice sharp creases. Lay out the 9 folded squares as shown in the picture below.


SEW THE SQUARES TOGETHER
Create 3 rows of 3. Layer two square together by opening the two touching flaps and stitch in the sharp crease. The flaps will stay loose. Stitch all 3 rows in this same manner. Complete the top by using the same process to sew the three rows together. You now have a 9 block square with all flaps loose.


STITCH DOWN THE FLAPS – LAY OUT YOUR WINDOWS
As you can see in the first image I have tacked down the flaps of each square. This can be done by hand but I find that just two or three securing stitches works great, about a 1/4″ in each direction. I like to first tack down all of the horizontal flaps and then the vertical flaps. This can make for neater stitching later.
Once all of the flaps have been secured it is time to add your contrasting fabric squares. Place one square onto each diamond that is created by the folded squares/flaps being stitched together. I like to lay all of mine out first and then use either pins or fabric glue to tack them into place. Note that on the sides you will need to cut some of your squares in to two triangles. Place the squares carefully with equal distance from all sides. For the triangles place the long edge right on the folded edge of the half diamond.


STICH TO CREATE WINDOWS
I like to stitch the “window frames” in a diagonal row from one corner to the opposite corner. The first time I pinned down the edges down but found that it was much easier just to roll the fabric into place using my fingers to hold the edges in. This happens naturally, the curve stretch and rolls into place because the fabric is on the bias. I stitched as close to the edge as possible. In the third pictures you can see that I “swerved” to sew each diagonal row all in one flowing topstitch. Be sure to secure the stitches at the beginning and end of each row. In the last picture you can see the resulting pillow top.


THE BACK
I love to do envelop backing on my pillow covers. Cut two 12″ x 14″ pieces of your backing fabric. On each piece, on the long side, fold over and press the edge 1/4″. Fold over again, this time 1/2″ to 1″.and press. Stitch down to secure the edge. This makes a nice strong edge for the overlapping side. Do this again with the second backing piece. Place the pillow top down, right side up. Place the backing pieces (right side down) overlapping with the finished edges to the center of the pillow cover. Pin the raw edges all the way around. I used my serger to sew the back to the front but you can do this on your regular sewing machine. Sew all the way around, clip your corners and turn the cover inside out.


My finished project measures 13 1/2″ x 13 1/2″. I used a 14″ square pillow form and it worked beautifully.
Give this technique a try. I think you will find that it is a fun challenge and well worth the effort. Next up is a baby quilt using this same process.

I decided I finally wanted to learn how to make a cathedral window block. There are quite a few techniques to choose from so I did some trial and error. This was made with Kona Cotton for the white background and some scraps from a quilt I made long ago. This is sure a great way to use up those little scraps! The final pillow is 13 1/2 x 13 1/2. I did an envelope closure and made my own insert.
Stay tuned for a write up of the technique I used and some pictures of the process.

Check out this new herd of Unicorn Lovies. I’m so excited to offer this adorable symbol of innocence and magic! It is said that a Unicorn brings good luck and fortune – a wonderful gift for any young child. As with all of my Lovies you can have these personalize or made in a different color.
I designed this Unicorn face/head using Embrilliance Stitch Artist. The freehand/free-motion quilting is stitched on my wonderful Brother Nouvelle 1500s (no two are exactly alike). The Lovie face is made with fleece (the horn is in satin), the embroidery is done with high quality polyester embroidery thread – no fading! All Lovies are baby safe – no buttons or pieces to fall off. The attached blanket is sewn and quilted on my home machine with high quality cotton flannel, fleece, cotton batting and rainbow satin binding.
Lovies are a perfect baby shower gift, but also perfect for a toddler that needs something they care for to take with them anywhere they go!
Please visit my Etsy shop to see all of the Lovies available and if you have a special request please send me a message so I can make the Lovie that will become a special keepsake for any child in your life.

 May 4th of this year was International Firefighters’ Day. In recognition for those that are so dedicated to serving I decided to design his wonderful Firefighter Lovie. This Lovie is perfect for any sweet boy or girl, especially if mom, dad, friend, or family member is one of our wonderful Firefighters!
The face was designed using Embrilliance Stitch Artist and did the quilting was done in a a free motion style on my wonder Brother Nouvelle 1500s. The Lovie face is made with fleece and a silky doll skin fabric. All Lovies are baby safe – no buttons or pieces to fall off. The attached blanket is sewn and quilted on my home machine with high quality cotton flannel, fleece, cotton batting and satin binding.
Please visit my Etsy shop to see all of the Lovies available and if you have a special request please send me a message so I can make the Lovie that will become a special keepsake for any special child in your life.


I just designed these new Cowboy Lovies and have added them to my Etsy shop. These are perfect for any sweet Cowboy! I designed the faces using Embrilliance Stitch Artist and did the quilting on my wonder Brother Nouvelle 1500s. The Lovie face is made with fleece and a silky doll skin fabric. All Lovies are baby safe – all embroidery, no buttons or pieces to fall off. The attached blanket is quilting with high quality cotton flannel, fleece, cotton batting and satin binding.
Please visit my Etsy shop to see all of the Lovies available and if you have a special request please send me a message so I can make the Lovie that will become a special keepsake for your special child.

I just designed these new Baby Lovies and have added them to my Etsy shop. These are perfect for kids of all ages! I designed the sweet faces using Embrilliance Stitch Artist and did the quilting on my wonder Brother Nouvelle 1500s. The Lovie face is made with fleece and a silky doll skin fabric. The faces are baby safe – all embroidery, no buttons or pieces to fall off. The attached blanket is quilting with high quality cotton flannel, fleece, cotton batting and satin binding.
Please visit my Etsy shop to see all of the Lovies available and if you have a special request please send me a message so I can make the Lovie that will become a special keepsake for your special child.
I have designed a new Lovie to join the ever growing Lovie family. This little Princess Lovie will make any sweet girl happy.
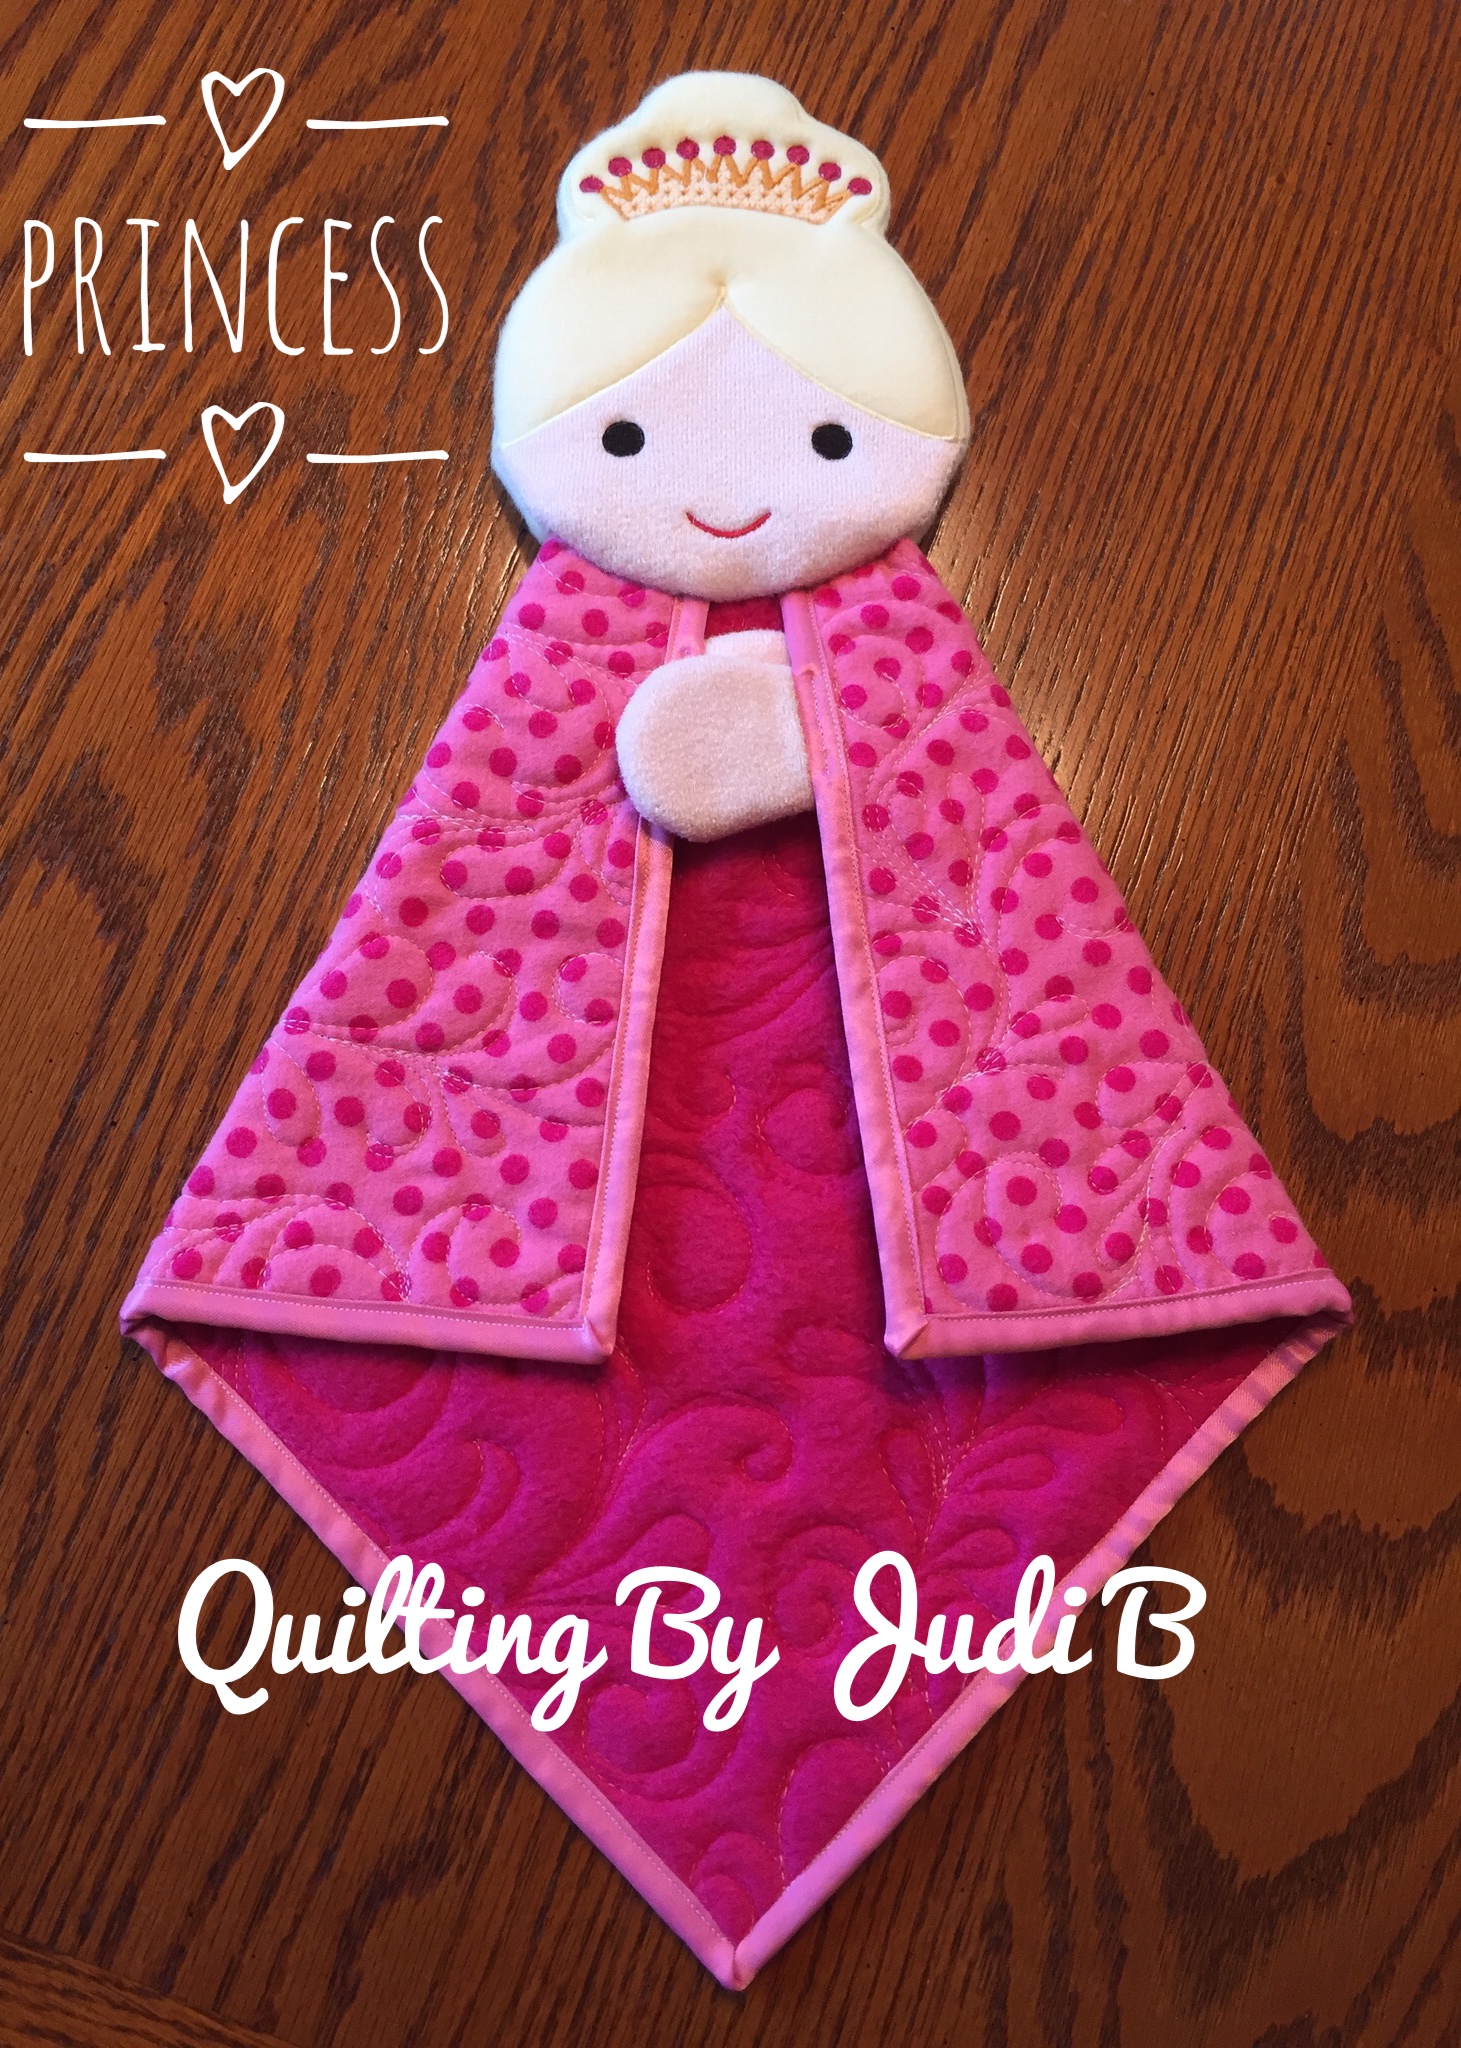
She can be made as pictured with “blond” hair or another color such as brown or black. I designed her in Embrilliance Stitch Artist. The sweet little face has adorable embroidered eyes and a crown with stitched jewels – no buttons or unsafe pieces to fall off. The blanket portion on this Lovie is done in a pink dot flannel and matching pink fleece. I quilted the blanket in a free-motion swirl pattern. Other fabric color combinations are available, simply put in a custom request and I will work with you to make the Lovie your little one will hold dear. Each Lovie is designed and made by me on my home sewing and embroidery machines.
Do you have an idea for a new Lovie? Please leave any comments or suggestions – I can design a custom Lovie for you to gift to someone special.

This post is about a fun project from earlier this year. I couldn’t post it earlier because the final item would be a gift for my nice. The thoughtful young lady that made the request was a bridesmaid in my niece’s wedding a few years ago and she wanted something special made for the approaching baby shower. Her idea was to have a plush owl made with fabric from her bridesmaid dress. What an awesome idea!
I searched online for ideas and proposed a mom owl with two little babies. I thought it would be cute to have the mom owl the size of a throw pillow that could be displayed and two little baby owls that would be perfect for a little one to play with. As I worked on the design I decided to give the mom owl a pocket for the babies to fit into.
I created paper patterns for the owls. Embrilliance Stitch Artist was perfect for designing embroidery patterns for the baby owls and the face for the mom owl. The babies were stitched almost completely in-the-hoop with only the feet added after stitching. The face for the mom owl was stitched onto the fabric pieces before assembly. I did free motion quilting on the satin pocket on the mom owl and on the wings for all three. It was awesome to make the custom design, and to use embroidery, quilting, and sewing in the final project!
The following fabrics were used:
The final owl set was the perfect keepsake for the mom to be!


